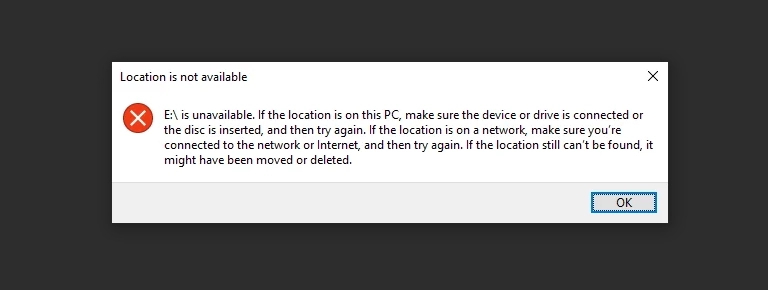
When your internal or external hard drive not showing up in File Explorer (Windows) or Finder (macOS), it creates a significant barrier to accessing your files. This common issue can occur even if the drive seems physically connected and powered.
This guide provides a systematic approach to troubleshoot why your hard drive is not showing up at the operating system level. We will cover safe diagnostic steps using built-in tools, explain common causes like missing drive letters or file system corruption, and clarify when these symptoms indicate a need for professional data recovery.
Understanding "Not Showing Up" vs. "Not Detected"
It is important to distinguish between a hard drive not showing up in the OS and a hard drive not detected by the computer’s basic hardware system (BIOS/UEFI). If the BIOS/UEFI does not recognize the drive at all, this indicates a more fundamental hardware issue covered in depth in our Hard Drive Not Detected guide
This article focuses on scenarios where the drive might be recognized at a low level but fails to appear correctly within Windows or macOS.
Why Is My Hard Drive Not Showing Up?
A hard drive might not show up due to various reasons: simple connection issues (cables, ports), power problems (especially external drives), missing drive letters in Windows, unmounted volumes in macOS, file system corruption (appearing RAW), partition table loss (unallocated), or serious hardware failure (drive not detected in BIOS/UEFI).
Step 1: Checking Drive Status in OS Utilities (Disk Management/Disk Utility)
The first step for a hard drive not showing up in standard file browsers is to check system disk management tools. These utilities often reveal drives the OS recognizes at a lower level.
Use these tools for diagnosis ONLY. Do NOT initialize, format, or run repairs if critical data is on the drive.
Using Disk Management (Windows)
- Right-click the Start button (or press Win + X).
- Select “Disk Management.”
- Look for your drive in the list (usually displayed as “Disk 0”, “Disk 1”, etc., in the lower pane).
Using Disk Utility (macOS)
Go to Applications > Utilities > Disk Utility.
Ensure “View” (in the top menu bar or top-left corner) is set to “Show All Devices.”
Look for your drive listed in the left-hand sidebar (it might show the manufacturer name or connection type like USB).
What to Look For in Disk Management / Disk Utility
Even if the drive doesn’t appear with a letter or volume name, it might show up here in one of these states:
- Healthy, but No Drive Letter (Windows): The partitions are listed with file systems (NTFS, FAT32), but no drive letter (like D:, E:) is assigned.
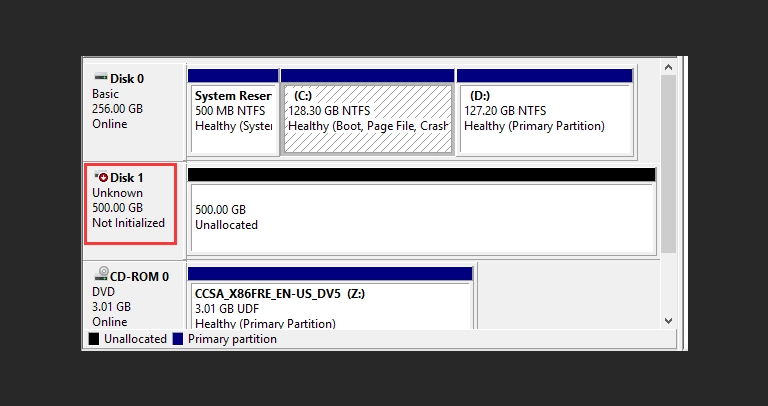
- Not Initialized / Unknown / Unallocated: The drive is listed, but the space shows as “Not Initialized” or completely “Unallocated.” This often happens with brand new drives or drives whose partition table is corrupted.
- RAW File System: A partition is listed, but the file system type is shown as “RAW.” This indicates file system corruption.
- Listed but Not Mounted (macOS): The drive or its volumes appear in Disk Utility but are greyed out, indicating they are not mounted (made accessible).
- Foreign Disk (Windows Server/RAID): Indicates a disk that was part of a different system’s dynamic disk or RAID setup.
Step 2: Addressing Common OS-Level Issues (Proceed with Extreme Caution!)
If your drive appears in system utilities but not standard file browsers, consider these OS-level reasons.
Some actions, like initializing or formatting, WILL ERASE DATA. Proceed only if you are certain the drive contains no needed data or after successful data recovery.
Assigning a Drive Letter (Windows)
- Problem: Drive is healthy and formatted but lacks a drive letter.
- Action (Relatively Safe): In Disk Management, right-click the partition (the healthy volume), select “Change Drive Letter and Paths…”, click “Add”, choose a letter, and click OK.
- Risk: Minimal risk if the partition is healthy.
Mounting a Volume (macOS)
Problem: Drive/volume appears in Disk Utility but is greyed out (unmounted).
Action (Relatively Safe): Select the greyed-out volume (not the parent drive) in Disk Utility and click the “Mount” button in the toolbar. If it mounts successfully, it should appear in Finder.
Risk: Minimal risk if the underlying file system is healthy. Failure to mount often indicates corruption. For more Mac-specific troubleshooting, especially with external drives, see our dedicated post: External Hard Drive Not Showing Up.
Initializing a Disk (Windows/macOS - DATA LOSS RISK!)
Problem: Drive shows as “Not Initialized” or “Unknown.” Often occurs with new, blank drives.
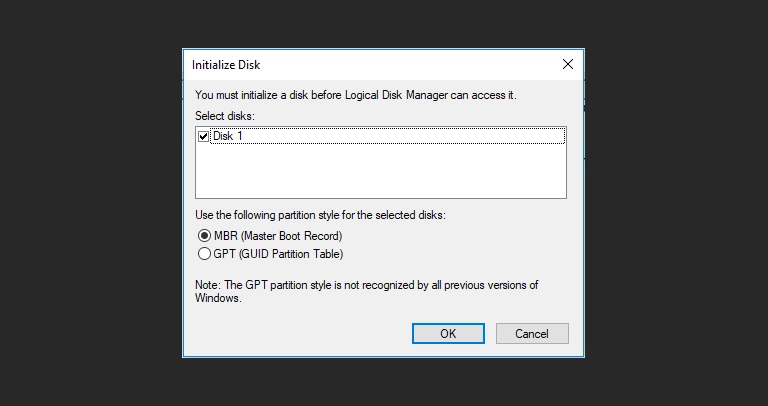
Action (ERASES DATA): In Disk Management, right-click the disk name (e.g., Disk 1) and choose “Initialize Disk.” Select a partition style (GPT is modern standard, MBR for older compatibility). On Mac, Disk Utility might prompt to initialize or use “Erase” on the parent drive. THIS WIPES ALL EXISTING DATA.
Guaranteed data loss if the drive wasn’t blank. Only do this for brand new drives or if you’ve already recovered needed data professionally. If a previously working drive suddenly shows as uninitialized, it likely indicates severe partition table corruption requiring data recovery before initialization.
RAW File System / Corruption (DATA LOSS RISK!)
Problem: Drive/partition shows as RAW or fails to mount due to corruption. Windows/macOS might prompt you to format it.
Action (DO NOT FORMAT): Formatting a RAW drive will erase the data. Standard repair tools (chkdsk, Disk Utility First Aid) are risky and can worsen data loss (see previous posts). The safest path is professional data recovery..
Unsupported File System
Problem: Drive is formatted with a file system your current OS doesn’t natively support (e.g., Linux Ext4 on Windows/Mac, macOS APFS on Windows).
Action: Use a computer with the compatible OS, or install third-party software/drivers that enable reading the file system (use reputable sources). Formatting is not required if you just need read access on an incompatible system.
Internal SSD Specifics
Modern NVMe SSDs sometimes require specific drivers or BIOS settings (like NVMe mode enabled). If an internal SSD is not showing up, check motherboard manufacturer support for driver/BIOS updates.
Recognizing When "Not Showing Up" Signals Deeper Problems
If OS-level fixes fail, or if the following symptoms accompany the hard drive not showing up, more severe issues, including physical failure, are likely::
- Drive Not Detected in BIOS/UEFI: This is a critical indicator the problem is hardware-level, not just OS configuration. See our guide on not detected hard drive.
- Clicking, Grinding, Beeping: Any unusual noises indicate mechanical failure requiring immediate power-off and professional help.
- Drive Disappears Intermittently: The drive might show up sometimes but vanish during use, suggesting failing components or connection issues.
- Very Slow Performance: Extreme sluggishness before it stopped showing up can indicate developing bad sectors or failing heads.
- S.M.A.R.T. Warnings: If you previously received drive health warnings from monitoring tools.
If physical failure is suspected, stop all troubleshooting attempts immediately to prevent further damage.
Don't Let Data Loss Ruin Your Business
Minimize business disruption. We retrieve lost data fast, so you can focus on what matters.
When Professional Data Recovery is the Necessary Path
Professional data recovery is necessary if a hard drive not showing up is due to a RAW file system, uninitialized status (on a previously working drive), or if it fails to mount despite basic OS-level fixes, and the data is critical. It’s also essential if physical symptoms like clicking/noises occur, or if the drive is entirely undetected by BIOS.
Consider professional data recovery if:
The drive is RAW or uninitialized/unallocated, containing critical data, and safe OS fixes fail.
You suspect underlying physical damage or the drive makes physical noises.
You are uncomfortable with technical troubleshooting or risk data loss.
The drive is entirely not detected by the computer’s BIOS/UEFI (a strong indicator of hardware failure).
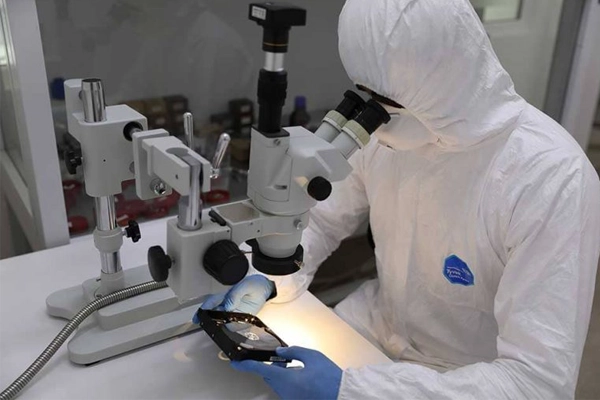
Professionals use specialized tools and cleanrooms when a hard drive not showing up is due to severe logical or physical issues. Details: Hard Drive Data Recovery Service Page.

Preventing Future "Not Showing Up" Issues
Good practices help:
-
Safely Eject Drives before unplugging.
-
Use Quality Cables/Power Supplies.
-
Protect from Shocks.
-
Monitor Drive Health (Basic S.M.A.R.T.).
-
Maintain Backups (essential protection).
Get a Free Consultation.
Our recovery experts are ready to assess your device and guide you through the safest path to recovery. Fill out the form to get started.
"*" indicates required fields
Conclusion: Systematic Checks and Prioritizing Data
A hard drive not showing up can range from simple fixes to hardware failure. Systematically check BIOS/UEFI, then OS disk tools to diagnose the cause.
Prioritize data safety: Avoid destructive actions (initializing, formatting, risky repairs) on drives with important data, especially with corruption or hardware issue signs.
If the drive is physically failing or contains critical inaccessible data, professional data recovery is the safest approach. Explore our Overview of Common Hard Drive Problems for more context.